
Although Windows 11 has improvements over previous versions, the C drive still runs out of space eventually, whether you use an SSD or a mechanical disk. Because many types and a massive amount of system files are continuously saved to the C partition, it will inevitably become full. Many users want to clean up the C drive in Windows 11 to remove junk files. Just like previous versions, there is a native Disk Cleanup tool in Windows 11. This article introduces how to run Disk Cleanup in Windows 11 using the wizard and commands. If you cannot reclaim a significant amount of free space after cleaning up the C drive on your computer, you had better add more space to the C drive from D or another volume.
How to Run Disk Cleanup in Windows 11 Computer
To clean up a disk in Windows 11, you can use either the native tool or third-party software. However, the Windows 11 Disk Cleanup utility is a better choice because it is very easy to use. Most importantly, it is fast and safe when deleting junk and unnecessary files from your computer. Unlike some third-party system optimization software, you do not need to worry about system safety or integrity. As with previous versions, you can clean up the C drive in Windows 11 using the graphical wizard.
Steps to clean up the C drive in Windows 11 with the Disk Cleanup wizard:
- Press the Windows + E keys to open File Explorer, right-click the C: drive, and select Properties.
- Click the Disk Cleanup button in the pop-up dialog box.
- Click the checkboxes in front of the files that you want to delete. All pre-listed types of files can be deleted safely, but it is recommended to read the corresponding description at the bottom in advance.
- Confirm the deletion in the next window.
If you like to clean up disk space via command, you can run Disk Cleanup in Windows 11 via cleanmgr cmd.
How to Clean Up C Drive in Windows 11 with Command
In general, there are 4 ways to run Disk Cleanup in Windows 11 via the command line. Select the method that best fits your needs.
1. Clean Up Specified Junk Files Manually
- Press the Windows + R keys together on the keyboard.
- Type "cleanmgr" and press Enter. The C: drive is selected by default; simply click OK to continue.
- Similar to the wizard method above, you need to select the files and confirm the deletion manually.
2. Clean Up All Junk Files Manually
- Press the Windows + R keys together on the keyboard.
- Type cleanmgr /LOWDISK and press Enter.
- The Disk Cleanup dialog box will pop up with all types of files selected by default, so you just need to click OK to confirm.
3. Clean Up All Junk Files Automatically
- Press the Windows + R keys together on the keyboard.
- Type cleanmgr /VERYLOWDISK and press Enter.
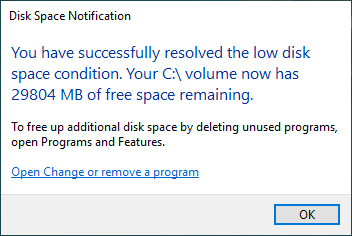
Then, Disk Cleanup will delete all junk files automatically and show you a dialog box with the results.
4. Clean Up Specified Junk Files Automatically
- Press the Windows + R keys together to open Run.
- Type cleanmgr /sageset:1 and press Enter. (You can specify any value from 0 to 65535).
- The Disk Cleanup dialog box will pop up; select the files you want to delete and click OK.
- In the future, you just need to run cleanmgr /sagerun:1 and press Enter, and the preselected junk files will be deleted automatically. If you want to configure different types of files, type cleanmgr /sageset:2 in step 2 and run cleanmgr /sagerun:2 in step 4.
If you cannot reclaim over 20GB of free space after cleaning up the C drive with Disk Cleanup, you had better consider additional methods. Otherwise, the free space will be eaten up quickly by newly generated junk files. You can try other methods to free up disk space. However, the most effective method is to add free space to the C drive from other volumes.
Increase C Drive Space After Cleaning Up Disk
All disk partitions are already allocated, but you can resize partitions using safe partitioning software. Shrink a data volume to get Unallocated space and then add it to the C drive. In this way, the operating system, programs, and everything else remain exactly the same as before. To accomplish this task, there is free partition software for Windows 11/10/8/7/Vista/XP home computer users.
NIUBI Partition Editor features Virtual Mode, Cancel-at-will, and 1-Second Rollback technologies to protect your system and data. If you still worry about data, you can clone the partition or the entire disk beforehand.
Download this tool and watch the video to see how to extend the C drive with free space from another volume:
Besides shrinking and extending partitions, this free partition software helps you perform many other operations such as moving, merging, converting, cloning, hiding, wiping partitions, scanning for bad sectors, and more. It is 100% clean without any bundled plugins.
 © 2009 - NIUBI Technology All Rights Reserved. |