
When the C drive is getting full on a Windows 11 computer, nobody wants to recreate partitions, reinstall the operating system, and reload all the programs. It also takes a long time if you need to recreate partitions and restore from a backup. Just like in Windows 7 and Windows 10, there is an "Extend Volume" option in Windows 11 Disk Management. It can extend the system partition and data volumes without losing data. Some people try to increase C drive space with Disk Management but fail because the Extend Volume option is grayed out. This article explains why Disk Management cannot extend the C drive in Windows 11 and what to do when you are unable to extend the C drive on your laptop, desktop, or tablet.
Why Disk Management Cannot Extend C Drive in Windows 11
1: No Adjacent Unallocated Space on the Right
First, you should know that the physical size of a disk is fixed. You can shrink and extend a partition, but you cannot resize a physical disk. Whether you use an SSD or a mechanical HDD, a 500GB disk cannot be decreased to 400GB or increased to 600GB. Before extending the C drive, you must delete or shrink another volume on the same disk to get Unallocated space.
With the Disk Management "Shrink Volume" function, you can shrink an NTFS partition without losing data, but it only generates Unallocated space on the right side of the shrunk volume. The major problem is that Disk Management can only extend Unallocated space to its left adjacent partition.
For example, after shrinking the D: drive via Disk Management, Unallocated space is created on the right side of D. Therefore, it is non-adjacent to the C drive.
This is the most common reason why you cannot extend the C drive in Windows 11 after shrinking D or another partition.
In some computers, there is a Recovery partition in the middle of the C and D drives. In this case, Extend Volume is grayed out for the C drive even after deleting D, because the Unallocated space is still non-adjacent to the C drive.

2: The Adjacent Partition Is Logical
In most Windows 11 laptops and desktops, the system disk is formatted as GPT style. Because of this, few people will encounter this issue, but it is still one of the reasons why you might be unable to extend the C drive with Disk Management.
Note: Deleting a partition is not recommended, and this section only explains the technical reason.
The "Extend Volume" function will be enabled for the C drive after deleting D only if D is a Primary partition. If D is a Logical partition, you still cannot extend the C drive in Windows 11, even after deleting D. Unlike an independent Primary partition, a Logical drive is just part of an "Extended partition". After deleting a Logical drive, its disk space is shown as "Free" instead of "Unallocated". This Free space cannot be extended into any Primary partition, even if it is contiguous and on the right side.
What to Do When You Are Unable to Extend C Drive in Windows 11
Solution 1: Move Unallocated Space Next to C Drive
If you have shrunk the D drive (or another adjacent volume) but cannot extend the C drive with the non-adjacent Unallocated space, you need to move the D drive rightward. The Unallocated space will then be moved behind the C drive at the same time. Once the Unallocated space is contiguous, the C drive can be extended easily. To move a partition and Unallocated space, you need third-party software, as no native Windows tool has this ability. There is free disk partition software for Windows 11/10/8/7/Vista/XP home computer users.
Download and launch NIUBI Partition Editor. You will see all disks with their partition layout and other information on the main window. In the example below, there is 30GB of Unallocated space that was shrunk from the D: drive.
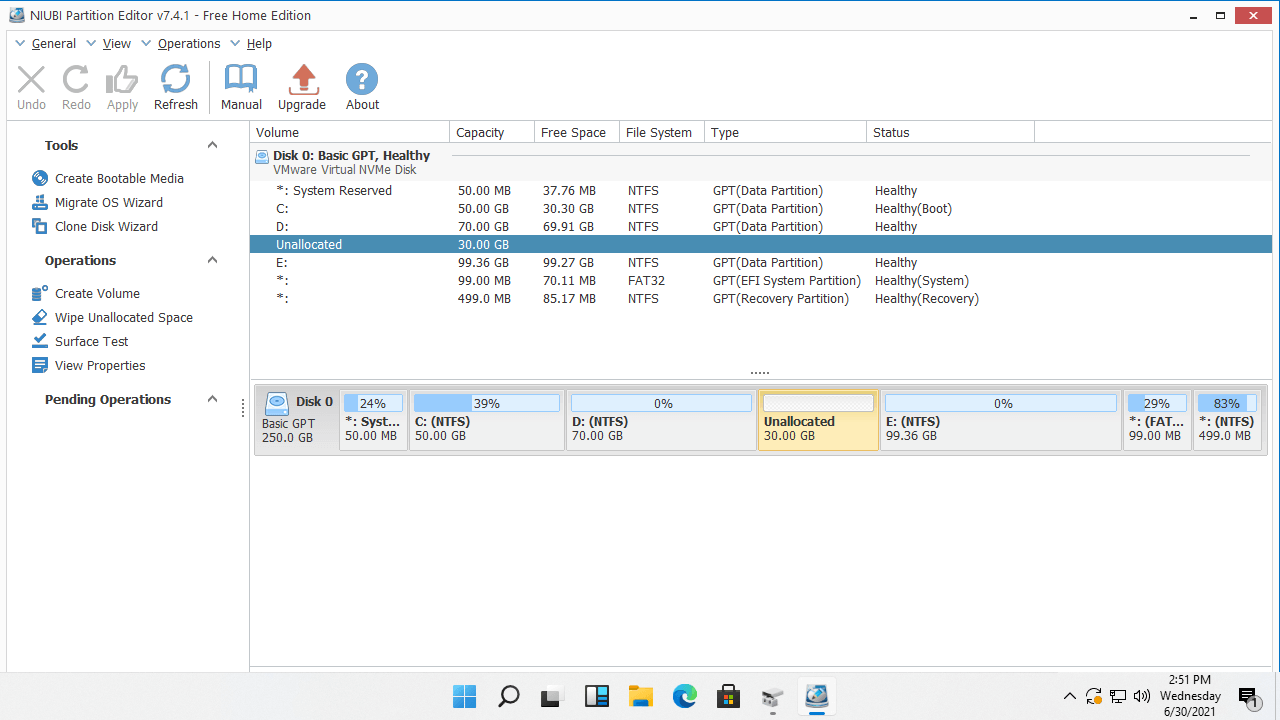
Steps when you cannot extend C drive in Windows 11 after shrinking D (or E:):
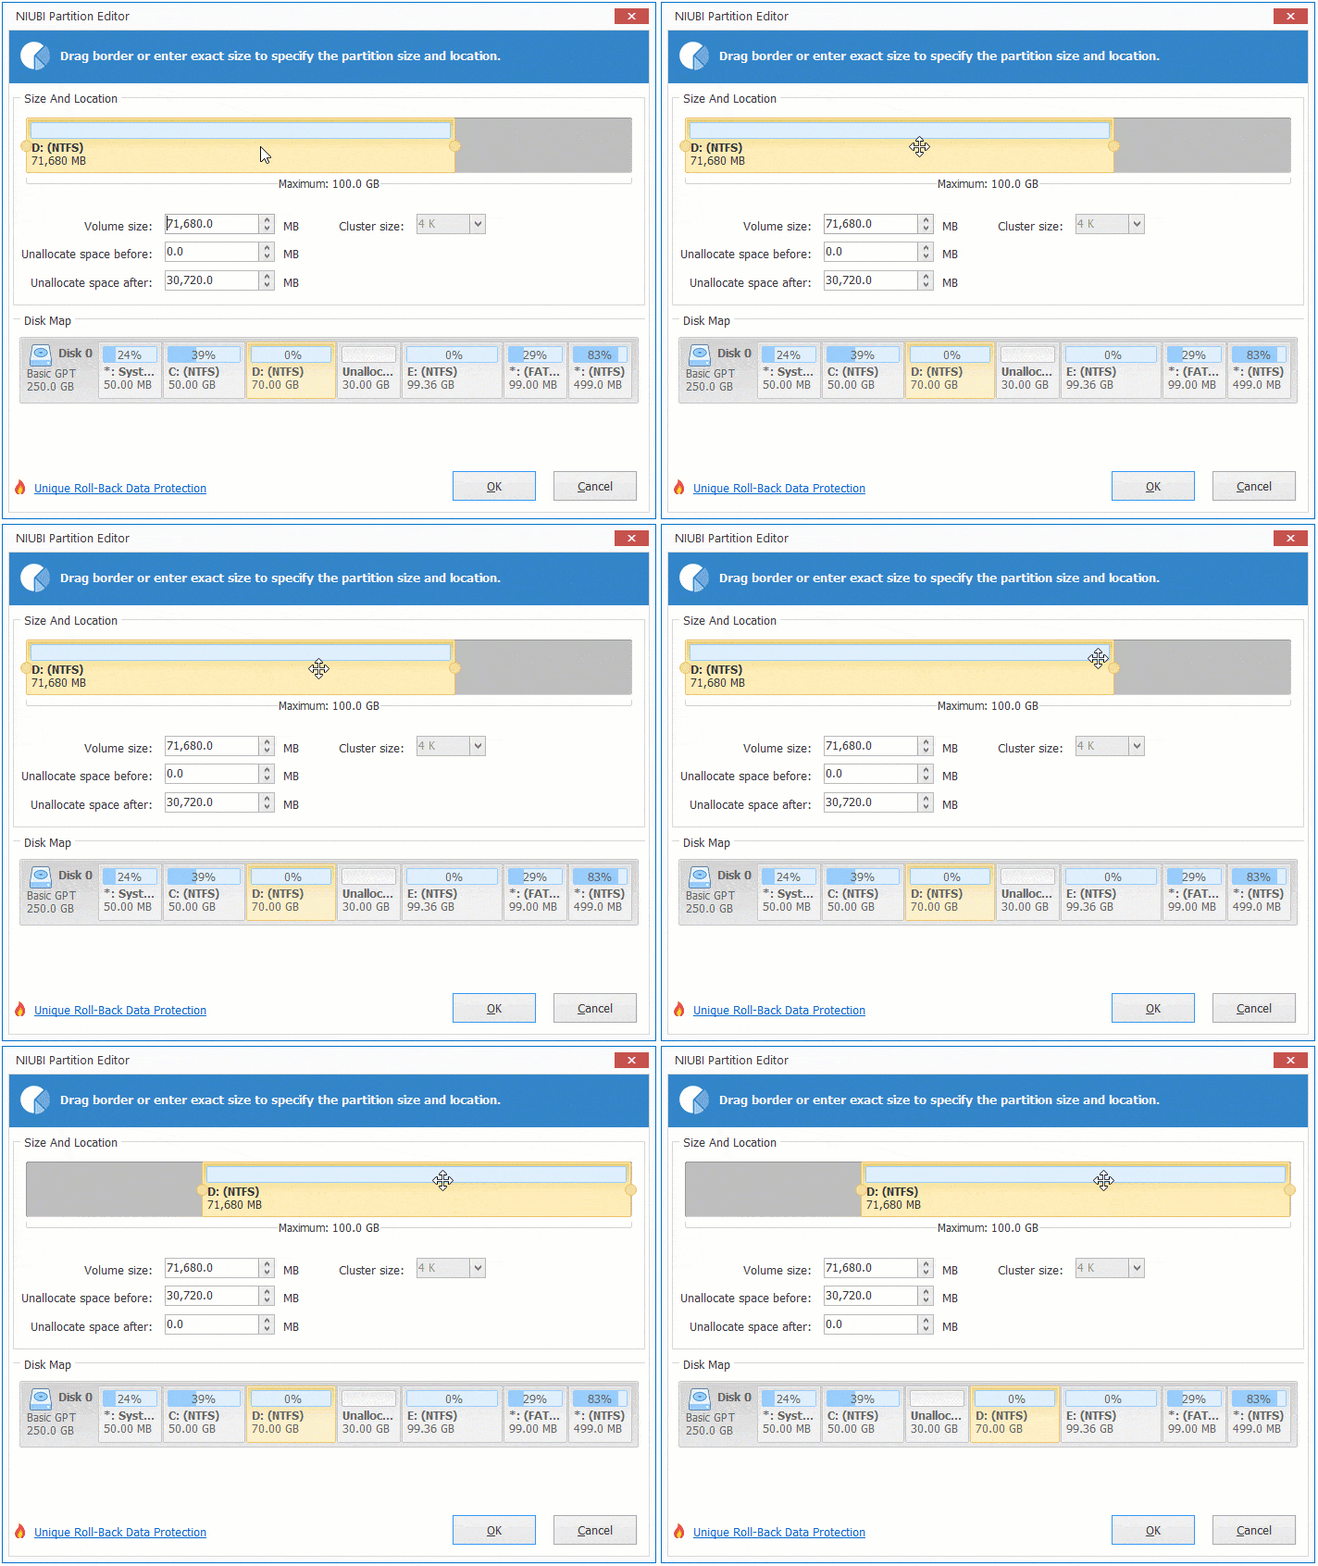
- Right-click the D: drive and select "Resize/Move Volume" option. Drag the middle of the D drive rightward in the pop-up window. Then, the D drive will be moved to the right, and the Unallocated space will be moved to the left side.
![Move D drive]()
- Right-click the C: drive and select "Resize/Move Volume" again. Drag the right border rightward to combine this adjacent Unallocated space.
- Click Apply on the top left to take effect.
Watch the video to see how to operate:
Solution 2: Recreate Partition and Shrink
If you have deleted the adjacent Logical partition D and still cannot extend the C drive in Windows 11 Disk Management, follow the steps below:
- Right-click this "Free" space in Disk Management and select the "New Simple Volume" option.
- Right-click the newly created partition in NIUBI Partition Editor and select "Resize/Move Volume". Drag the left border rightward to shrink this partition and generate Unallocated space on the left. (If you do not want to keep this partition, delete it with NIUBI Partition Editor).
- Follow step 2 in the previous solution to add the Unallocated space to the C drive.
Note: If you delete a Logical drive using Disk Management, its space is shown as "Free". However, if you delete it with NIUBI Partition Editor, the disk space will be converted to "Unallocated".
Besides shrinking, moving, and extending partitions, NIUBI Partition Editor helps you perform many other disk partition management operations, such as merging, converting, defragging, hiding partitions, erasing data, and optimizing file systems.
 © 2009 - NIUBI Technology All Rights Reserved. |